
When buying a smart thermostat, consider your needs and system compatibility. Prepare a toolkit, study manuals, and assess electrical circuits for efficient installation. Wall preparation is key; check weight support and clear debris. Connect wires correctly to HVAC system terminals for accurate temperature control. Program the thermostat via mobile apps and troubleshoot minor issues. Test temperature settings in various scenarios for optimal comfort and energy savings.
Looking to upgrade your home’s comfort with a smart thermostat? This comprehensive guide takes you through every step of the process, from evaluating top smart thermostat options to testing and optimizing temperature control. We equip you with the knowledge needed for a successful smart thermostat installation, ensuring energy efficiency and personalized comfort. Get ready to transform your living space with advanced climate control.
- Evaluating Your Smart Thermostat Options
- Preparing for Installation: Necessary Tools
- Mounting the Thermostat: Wall Preparation
- Wiring Connections: Step-by-Step Guide
- Programming Your New Smart Thermostat
- Testing and Optimizing Temperature Control
Evaluating Your Smart Thermostat Options
When evaluating your smart thermostat options, consider the various models available to suit different needs and preferences. The market offers a wide array of choices, from basic smart thermostats that allow for remote control via a smartphone app to advanced systems integrating with home automation platforms. Some models are designed for specific types of heating and cooling systems, such as those compatible with solar panels or smart boilers, ensuring seamless integration and optimal performance.
Best practices for smart thermostat setup include proper placement—usually near windows or doors—to accurately sense room temperatures. Review the manufacturer’s instructions thoroughly, as installation steps can vary. Keep in mind that some models may require professional smart thermostat installation, especially if you have complex heating or cooling systems like a heat pump or boiler repair needs. Consider the potential benefits of a smart grid and smart thermostats in terms of energy savings and environmental impact to make an informed decision.
Preparing for Installation: Necessary Tools

Before beginning the smart thermostat installation, ensure you have all the necessary tools at hand to make the process smooth and efficient. A basic toolkit for any smart thermostat installation should include a screwdriver, wire stripper, pliers, and a voltage tester. Some advanced kits may come with additional tools specific to your model. For instance, if installing in a rental property, you might need tools that allow for quick disassembly and reassembly to accommodate move-outs and -ins.
The step by step smart thermostat installation starts with preparing these tools, understanding your device’s manual, and assessing the electrical circuit where the thermostat will be placed. This preparation ensures that the smart thermostat installation is both secure and efficient, optimizing energy savings from day one.
Mounting the Thermostat: Wall Preparation

Before you begin wiring a smart thermostat, proper wall preparation is crucial for a seamless smart thermostat installation. Start by ensuring your wall is ready by checking if it can support the weight of the new device and verifying that there are no electrical or plumbing lines running behind it. This step is essential to avoid any damage during mounting and to guarantee stable placement for optimal performance.
Use suitable tools like a stud finder to locate studs for secure attachment, marking the spot where the thermostat will be affixed. Prepare the area by removing any debris, ensuring accessibility for both installation and future maintenance. Keep in mind that smart thermostat setup tips and tricks often involve making adjustments to accommodate existing wall structures, so being prepared beforehand saves time and effort from professional HVAC installers near me. Verify compatibility with your system as well, considering the smart thermostat’s compatibility with existing systems, to guarantee a smooth transition during replacement or new installations.
Wiring Connections: Step-by-Step Guide
When wiring a smart thermostat, follow these clear steps for efficient smart thermostat installation. Begin by locating the appropriate wires within your existing HVAC system—typically, you’ll need to identify the low-voltage control wires and the power source. Connect the smart thermostat’s ‘C’ (common) terminal to the power source, ensuring it’s grounded for safety. Next, wire the ‘R’ (heat) and ‘C’ (cool) terminals to the corresponding control circuits of your heating and cooling systems. For a more precise temperature control, consider running separate wires for each zone in your home, especially if you have a multi-zone system.
Remember, proper smart thermostat installation is key to unlocking the full potential of smart heating and cooling solutions. Whether you’re installing it in your bedroom or another part of your house, ensure all connections are secure and labeled correctly. This process allows for efficient energy management, as smart thermostats help reduce energy consumption by optimizing temperature settings throughout your home, ultimately contributing to lower utility bills.
Programming Your New Smart Thermostat

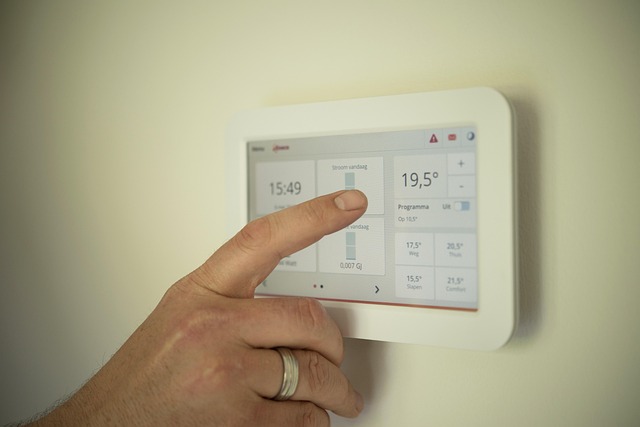
After successfully wiring your new smart thermostat, it’s time to bring it to life through programming. Most models offer user-friendly mobile apps that guide you through this process, making it as simple as setting up a regular thermostat. Start by connecting your smartphone to the same Wi-Fi network as your thermostat using the provided app. Then, follow the on-screen instructions to set your desired temperature and schedule. This is where optimizing indoor comfort with technology truly shines—you can program different settings for various times of day or even zones within your home, ensuring a comfortable environment while saving energy.
During setup, you might encounter common issues like a smart thermostat not connecting. Double-check your Wi-Fi connection and ensure both your smartphone and thermostat are powered on. If the problem persists, try restarting both devices or consult the manufacturer’s troubleshooting guide. Remember, addressing these minor hurdles is part of ensuring resolve smart temperature control issues at home effectively.
Testing and Optimizing Temperature Control

After successfully wiring your smart thermostat, it’s time to test its temperature control capabilities. Adjust the settings to simulate various scenarios—from a cozy 20°C (68°F) for winter days to a more energizing 24°C (75°F) for summer nights. Observe how the smart thermostat responds, ensuring it heats or cools your space efficiently without drastic temperature swings. This step is crucial in optimizing indoor comfort with technology.
Remember that a smart thermostat installation isn’t just about convenience; it’s also about contributing to a smarter grid and more energy-efficient homes. By fine-tuning these settings, you’re not only enhancing your personal comfort but also playing a part in the broader adoption of smart thermostats, which can collectively reduce energy consumption and environmental impact, aligning with global efforts towards sustainability and technological advancement.
Wiring a smart thermostat is an accessible DIY project that can significantly enhance your home’s energy efficiency. By following this comprehensive guide, from evaluating options to testing temperature control, you’ve taken a significant step towards a smarter and more sustainable living environment. Remember, proper preparation and a methodical approach ensure a smooth installation process. Now, enjoy the benefits of precise climate control tailored to your preferences, all while potentially reducing energy costs. Happy throttling!