
Thoroughly research and prepare for heating controls repair by identifying your system (gas boiler, electric, etc.), gathering tools, and understanding manufacturer instructions. Prioritize safety, disconnect power, remove old thermostat, and schedule professional help for complex tasks. Install a new control, wire accurately, configure settings, test existing unit's performance, and clean regularly to enhance efficiency in heating controls repair.
Looking to save on heating costs and take control of your indoor climate? Learn how to replace your old thermostat with a new, energy-efficient model using our step-by-step guide. This DIY project involves assessing your heating system, gathering tools, safely turning off power, removing the old thermostat, installing the new heating control, testing, and calibrating for optimal performance. Streamline your home comfort and enhance your HVAC system’s efficiency with these straightforward steps.
- Assess Your Heating System and Tools Needed
- Turn Off Power and Remove Old Thermostat
- Install New Heating Control: Wiring and Settings
- Test and Calibrate for Optimal Performance
Assess Your Heating System and Tools Needed
Before you begin replacing your heat stat, it’s crucial to assess your existing heating system and gather the necessary tools for the job. Knowing what type of heating system you have—whether it’s a gas boiler, electric heater, or another mechanism—is essential as each has its own specific requirements and procedures. Accessing the heat stat itself might involve removing vents or panels, so ensure you’re comfortable with these tasks before starting.
For most systems, especially those with programmable thermostats, you’ll need basic tools like a screwdriver, pliers, and possibly a multimeter for testing connections (gas boiler troubleshooting guide). Programming a thermostat involves precise steps that differ based on the model, so refer to your manufacturer’s instructions or consult a professional if needed. Remember, accurate diagnosis and safe handling of components like thermostats and boilers are paramount in any heating controls repair endeavor.
Turn Off Power and Remove Old Thermostat
Before you begin any DIY project involving heating controls repair, it’s crucial to ensure safety by turning off the power to your system. This step is essential to prevent accidents and damage to your equipment. Once the power is shut off, locate and remove the old thermostat, which is typically situated near the furnace or heat pump. This process involves unscrewing or detaching the existing thermostat from its mounting surface, taking care not to disrupt any associated wiring.
Remember that a proper furnace filter change instructions and regular maintenance, such as addressing a heat pump freezing up, can significantly extend the lifespan of your heating system. If you encounter any issues beyond your comfort level or need urgent assistance, don’t hesitate to contact an emergency plumber Bromsgrove for professional support.
Install New Heating Control: Wiring and Settings
When it comes to heating controls repair, installing a new heating control is often a crucial step in enhancing your home’s comfort and energy efficiency. This process involves careful wiring and configuring the settings for optimal performance. Start by locating the existing wires connected to the old thermostat, then carefully disconnect them. Ensure you identify each wire by its color and label for future reference during how to reset thermostat procedures or electric boiler maintenance. Next, prepare the new heating control according to the manufacturer’s instructions, attaching the necessary wires and ensuring proper connections. Once wired, navigate through the control’s settings, configuring temperature preferences and scheduling options to suit your needs. This step is vital for achieving efficient fix central heating system functionality.
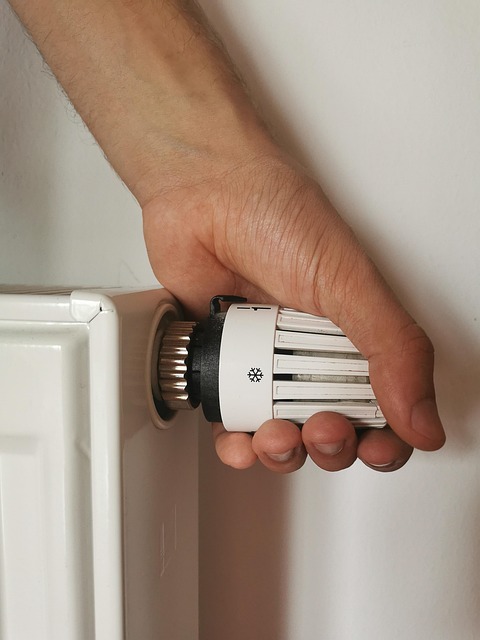
Test and Calibrate for Optimal Performance

Before replacing your heat stat, it’s crucial to test and calibrate your existing one for optimal performance. Start by checking the settings to ensure they align with your desired comfort levels. Then, use a multimeter to verify the voltage and current readings at different thermostat settings. This step is essential in ensuring your new heat stat will function correctly and efficiently.
Additionally, consider the environmental factors that might impact your heating controls repair, such as humidity levels. If you’re dealing with a humidifier repair near me or experiencing issues with other appliances like a dishwasher heating problem, addressing these could indirectly improve overall system performance. Regular heating system cleaning is another vital aspect that can prevent buildup and ensure smooth operation, enhancing the effectiveness of your heat stat replacement process.
Replace your heat stat with our step-by-step guide videos and take control of your home’s temperature. By understanding your heating system, gathering the necessary tools, and following simple instructions, you can effortlessly install a new heating control, ensuring optimal performance and comfort. With these DIY skills, you’ll be well-equipped to tackle future heating controls repair tasks with confidence.